《Elasticsearch技术解析与实战》Chapter 1.4 Spring Boot整合Elasticsearch

1. spring-boot-starter-data-elasticsearch

1.1 pom.xml和application.yml

1
2
3
4
5
6
7
8
9
10
11
12
<!-- Spring Boot Elasticsearch 依赖 -->
<dependency>
<groupId>org.springframework.boot</groupId>
<artifactId>spring-boot-starter-data-elasticsearch</artifactId>
</dependency>
spring:
data:
elasticsearch:
repositories:
enabled: true
cluster-name: docker-cluster
cluster-nodes: lujiahao.ml:9300

1.2 创建Repository

1
2
3
4
@Repository
public interface PersonEsRepository extends ElasticsearchRepository<Person,Long> {
List<Person> findPersonByName(String name);
}

1.3 文档实体类

1
2
3
4
5
6
7
8
9
10
@Data
@Document(indexName = "person", type = "chinese")
public class Person implements Serializable{
private static final long serialVersionUID = -6804453833406105286L;
@Id
private Long id;
private String name;
private Integer age;
private String address;
}

1.4 增删改查

1
2
3
4
5
6
7
8
9
10
11
12
13
14
15
16
17
18
19
20
21
22
23
24
25
26
27
28
29
@Service
public class EsStarterService {
@Autowired
private PersonEsRepository repository;
/**
* 增
*/
public Person save(Person person) {
return repository.save(person);
}
/**
* 删
*/
public void delete(Person person) {
repository.delete(person);
}
/**
* 改
*/
public Person update(Person person) {
return repository.save(person);
}
/**
* 查
*/
public Iterable<Person> findAll() {
return repository.findAll();
}
}

1.5 单元测试

1
2
3
4
5
6
7
8
9
10
11
12
13
14
15
16
17
18
19
20
21
22
23
24
25
26
27
28
29
30
31
32
@RunWith(SpringRunner.class)
@SpringBootTest
public class EsStarterServiceTest {
@Autowired
private EsStarterService esStarterService;
@Test
public void save() {
Person person = new Person();
person.setId(new Random().nextLong());
person.setName("lujiahao");
esStarterService.save(person);
}
@Test
public void delete() {
Person person = new Person();
person.setId(-5264182431891613084L);
person.setName("lujiahao123456");
esStarterService.delete(person);
}
@Test
public void update() {
Person person = new Person();
person.setId(542136934419565287L);
person.setName("lujiahao123456");
esStarterService.update(person);
}
@Test
public void findAll() {
Iterable<Person> all = esStarterService.findAll();
all.forEach(System.out::println);
}
}

2. ElasticsearchTemplate

2.1 pom.xml和application.ym

1
2
3
4
5
6
7
8
9
10
11
12
<!--elasticsearch-->
<dependency>
<groupId>org.springframework.data</groupId>
<artifactId>spring-data-elasticsearch</artifactId>
</dependency>
spring:
data:
elasticsearch:
repositories:
enabled: true
cluster-name: docker-cluster
cluster-nodes: lujiahao.ml:9300

2.2 文档实体类

同上

2.3 增删改查

1
2
3
4
5
6
7
8
9
10
11
12
13
14
15
16
17
18
19
20
21
22
23
24
25
26
27
28
29
30
31
32
33
34
35
36
37
38
39
40
41
42
43
44
45
46
47
48
49
50
51
52
53
54
55
56
57
58
59
60
61
62
63
64
65
66
67
68
69
70
71
72
@Service
public class ElasticsearchTemplateService {

@Autowired
public ElasticsearchTemplate elasticsearchTemplate;


private static final String INDEX_NAME = "person";
private static final String TYPE_NAME = "chinese";
/**
* 增
*/
public String save(Person person) {
IndexQuery indexQuery = new IndexQueryBuilder()
.withIndexName(INDEX_NAME)
.withType(TYPE_NAME)
.withId(String.valueOf(person.getId()))
.withObject(person)
.build();
String index = elasticsearchTemplate.index(indexQuery);
System.out.println("xxxxxxxxxxxx " + index);
return index;
}

/**
* 删
*/
public void deleteByName(String name) {
DeleteQuery deleteQuery = new DeleteQuery();
deleteQuery.setQuery(QueryBuilders.matchQuery("name", name));
deleteQuery.setIndex(INDEX_NAME);
deleteQuery.setType(TYPE_NAME);
elasticsearchTemplate.delete(deleteQuery);
}

/**
* 改
*/
public UpdateResponse update(Person person) {
try {
UpdateRequest updateRequest = new UpdateRequest()
.index(INDEX_NAME)
.type(TYPE_NAME)
.id(String.valueOf(person.getId()))
.doc(XContentFactory.jsonBuilder()
.startObject()
.field("name", person.getName())
.endObject());
UpdateQuery updateQuery = new UpdateQueryBuilder()
.withIndexName(INDEX_NAME)
.withType(TYPE_NAME)
.withId(String.valueOf(person.getId()))
.withClass(Person.class)
.withUpdateRequest(updateRequest)
.build();
UpdateResponse update = elasticsearchTemplate.update(updateQuery);
return update;
} catch (Exception e) {
return null;
}
}

/**
* 查
*/
public List<Person> getAll() {
SearchQuery searchQuery = new NativeSearchQueryBuilder()
.withQuery(QueryBuilders.matchAllQuery())
.build();
return elasticsearchTemplate.queryForList(searchQuery, Person.class);
}
}

2.4 单元测试

1
2
3
4
5
6
7
8
9
10
11
12
13
14
15
16
17
18
19
20
21
22
23
24
25
26
27
28
29
30
31
@RunWith(SpringRunner.class)
@SpringBootTest
public class ElasticsearchTemplateServiceTest {
@Autowired
private ElasticsearchTemplateService elasticsearchTemplateService;
@Test
public void save() {
Person person = new Person();
person.setId(new Random().nextLong());
person.setName("haha");
String save = elasticsearchTemplateService.save(person);
System.out.println(save);
}
@Test
public void deleteByName() {
elasticsearchTemplateService.deleteByName("lujiahao");
}
@Test
public void update() {
Person person = new Person();
person.setId(-5264182431891613084L);
person.setName("hahaaaaaaaaa");
UpdateResponse update = elasticsearchTemplateService.update(person);
System.out.println(update);
}
@Test
public void getAll() {
List<Person> all = elasticsearchTemplateService.getAll();
System.out.println(all);
}
}

3. 代码示例

1
https://github.com/lujiahao0708/LearnSeries/tree/master/LearnElasticSerach

Tips

本文同步发表在公众号,欢迎大家关注!😁
后续笔记欢迎关注获取第一时间更新!

《Elasticsearch技术解析与实战》Chapter 1.3 Elasticsearch增删改查

1. 新增文档,建立索引

语法格式:

PUT /index/type/id
{
  "json数据"
}

输入:

PUT /person/chinese/1
{
  "id":12345,
  "name":"lujiahao",
  "age":18
}

输出:

{
  "_index": "person",
  "_type": "chinese",
  "_id": "1",
  "_version": 1,
  "result": "created",
  "_shards": {
    "total": 2,
    "successful": 1,
    "failed": 0
  },
  "created": true
}

es会自动建立index和type,不需要提前创建,而且es默认会对document每个field都建立倒排索引,让其可以被搜索。

2. 检索文档

格式:

GET /index/type/id

输入:

GET /person/chinese/1

输出:

{
  "_index": "person",
  "_type": "chinese",
  "_id": "1",
  "_version": 1,
  "found": true,
  "_source": {
    "id": 12345,
    "name": "lujiahao",
    "age": 18
  }
}

3. 更新文档

3.1 替换方式

格式:

PUT /index/type/id
{
    "json数据"
}

输入:

PUT /person/chinese/1
{
  "name":"lujiahao123"
}

输出:

{
  "_index": "person",
  "_type": "chinese",
  "_id": "1",
  "_version": 2,
  "result": "updated",
  "_shards": {
    "total": 2,
    "successful": 1,
    "failed": 0
  },
  "created": false
}

查询:

{
  "_index": "person",
  "_type": "chinese",
  "_id": "1",
  "_version": 2,
  "found": true,
  "_source": {
    "name": "lujiahao123"
  }
}

替换方式更新文档时,必须带上所有的field,才能去进行信息的修改;如果缺少field就会丢失部分数据。其原理时替换,因此需要全部字段。不推荐此种方式更新文档。

3.1 更新方式

格式:

POST /index/type/id/_update
{
    "doc":{
        "json数据"
    }
}

输入:

POST /person/chinese/1/_update
{
  "doc":{
    "name":"lujiahao10010"
  }
}

输出:

{
  "_index": "person",
  "_type": "chinese",
  "_id": "1",
  "_version": 4,
  "result": "updated",
  "_shards": {
    "total": 2,
    "successful": 1,
    "failed": 0
  },
  "created": false
}

再次查询:

{
  "_index": "person",
  "_type": "chinese",
  "_id": "1",
  "_version": 6,
  "found": true,
  "_source": {
    "id": 12345,
    "name": "lujiahao10010",
    "age": 18
  }
}

4. 删除文档

格式:

DELETE /index/type/id/_update
{
    "doc":{
        "json数据"
    }
}

输入:

DELETE /person/chinese/1

输出:

{
  "found": true,
  "_index": "person",
  "_type": "chinese",
  "_id": "1",
  "_version": 7,
  "result": "deleted",
  "_shards": {
    "total": 2,
    "successful": 1,
    "failed": 0
  }
}

再次查询:

{
  "_index": "person",
  "_type": "chinese",
  "_id": "1",
  "found": false
}

5. 小结

本文所有操作都是在kibana的Dev tools中进行的,相较于Elasticsearch-Heade插件,kibana中更加方便与美观(个人观点),推荐大家使用。

Tips

本文同步发表在公众号,欢迎大家关注!😁
后续笔记欢迎关注获取第一时间更新!

《Elasticsearch技术解析与实战》Chapter 1.2 Elasticsearch安装

1. 下载安装

1.1 下载

1
2
https://www.elastic.co/downloads/elasticsearch
下载 https://artifacts.elastic.co/downloads/elasticsearch/elasticsearch-6.7.0.tar.gz

1.2 解压

1
tar -zxvf elasticsearch-6.7.0.tar.gz

1.3 运行

1
2
cd elasticsearch-6.7.0
bin/elasticsearch

1.4 检验

1
2
3
4
5
6
7
8
9
10
11
12
13
14
curl http://localhost:9200  或者浏览器访问
{
"name": "q9sdES9",
"cluster_name": "docker-cluster",
"cluster_uuid": "6klEi4d0Q6y0LC3YNYVXTQ",
"version": {
"number": "5.5.0",
"build_hash": "260387d",
"build_date": "2017-06-30T23:16:05.735Z",
"build_snapshot": false,
"lucene_version": "6.6.0"
},
"tagline": "You Know, for Search"
}

2. Docker部署

官方文档 : https://www.elastic.co/guide/en/elasticsearch/reference/current/docker.html

2.1 拉取镜像

1
docker pull docker.elastic.co/elasticsearch/elasticsearch:5.5.1

2.2 启动容器

1
docker run -p 9200:9200 9300:9300 -e "http.host=0.0.0.0" -e “transport.host=0.0.0.0" --name elasticsearch_5.5.0 -d docker.elastic.co/elasticsearch/elasticsearch:5.5.0

2.3 修改配置

1
2
3
4
5
进入到容器中 : docker exec -it elasticsearch_5.5.0 /bin/bash
修改jvm配置 : vi /config/jvm.options
-Xms2g —> -Xms512m
-Xmx2g —> -Xmx512m
修改小一些,服务器内存有限😂

2.4 重启容器,查看是否成功

1
2
3
4
5
6
7
8
9
10
11
12
13
14
15
http://服务器ip:9200
{
"name": "q9sdES9",
"cluster_name": "docker-cluster",
"cluster_uuid": "6klEi4d0Q6y0LC3YNYVXTQ",
"version": {
"number": "5.5.0",
"build_hash": "260387d",
"build_date": "2017-06-30T23:16:05.735Z",
"build_snapshot": false,
"lucene_version": "6.6.0"
},
"tagline": "You Know, for Search"
}
此处集群的名称为 docker-cluster, 可以自行修改 : vi /config/elasticsearch.yml

Tips

本文同步发表在公众号,欢迎大家关注!😁
后续笔记欢迎关注获取第一时间更新!

《Elasticsearch技术解析与实战》Chapter 1.1:Elasticsearch入门和倒排索引

1. 简介

Elasticsearch是一个机遇Lucene构建的开源、分布式、RESTful接口全文搜索引擎。同时,Elasticsearch还是一个分布式文档数据库,能够扩展至数百个服务器存储以处理PB级数据,通常作为复杂搜索场景的首选利器。

Elasticsearch的优点:

  1. 横向可扩展性:只需要增加一台服务器,配置完毕即可加入集群。
  2. 分片机制提供更好的分布性:同一个索引分成多个分片,类似于HDFS的块机制,分而治之的方式提升处理效率。
  3. 高可用:提供复制机制,一个分片可以设置多个副本,在某台服务器宕机情况下,集群依旧可以工作,并在宕机服务器重启后恢复数据。
  4. 使用简单:开箱即用,快速搭建搜索服务。

Elasticsearch wiki:https://zh.wikipedia.org/wiki/Elasticsearch

2. 数据库搜索

在数据量少的情况下可以当做搜索服务来使用,然而数据库归根结底是做持久化存储。如果数据量大就需要做搜索服务,底层数据还是关系数据库。我司老系统中有一个订单表,数据量已经高达两亿,客服等后台系统通常带有范围或批量条件等查询,这时数据库基本上就无法响应了,报警根本停不下来。因此,用数据库来实现搜索,性能差,可用性不高。

3. Lucene

Lucene是一个开源的全文搜索引擎工具包,其目的是为开发者提供一个简单工具包,以快速实现全文检索的功能。

Lucene wiki:https://zh.wikipedia.org/wiki/Lucene

4. 倒排索引

倒排索引中的索引对象是文档或者文档集合中的单词等,用来存储这些单词在一个文档或者一组文档中的存储位置,是对文档或者文档集合的一种最常用的索引机制。搜索引擎的关键步骤就是建立倒排索引,下面介绍Lucene是如何建立倒排索引和相应的生成算法。

假设有两篇文章:
文章1:Tom lives in Guangzhou, I live in Guangzhou too.
文章2:He once lived in Shanghai.

4.1 取得关键词

Lucene是基于关键词索引和查询的,首先要进行关键词提取:

  • 分词:英文单词由空格分隔,较好处理;中文词语由于是连在一起的,需要进行特殊的分词处理(后面会介绍分词器相关知识)。

  • 过滤无概念词语:英文中“in”“once”“too”等词没有实际意义;中文中“的”“是”等也无实际意义,这些无概念词语可以过滤掉。

  • 统一大小写:“he”和“HE”表示的含义一样,所以单词需要统一大小写。

  • 语义还原:通常用户查询“live”时希望能将“lives”和“lived”也查询出来,所以需要将“lives”和“lived”还原成“live”。

  • 过滤标点符号

    经过以上过滤,得到如下结果:
    文章1关键词:tom live guangzhou i live guangzhou
    文章2关键词:he live shanghai

4.2 建立倒排索引

关键词建立完成后,就可以进行倒排索引建立了。过滤后的关系是:“文章号“对”文章中所有关键词“,倒排索引把这个关系倒过来变成:”关键词“对”拥有关键词的所有文章号“。

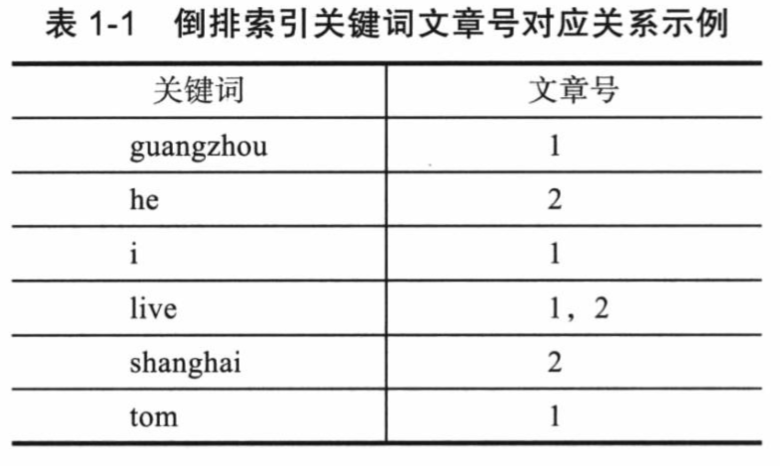
通常仅知道关键词在哪些文章中出现还不够,还需要知道关键词在文章中出现的次数和位置,通常有两种位置:

  1. 字符位置,即记录该词是文章中第几个字符(优点是显示并定位关键词快)。
  2. 关键词位置,即记录该词是文章中的第几个关键词(优点是节约索引空间、词组查询快),Lucene中记录的就是这种位置。

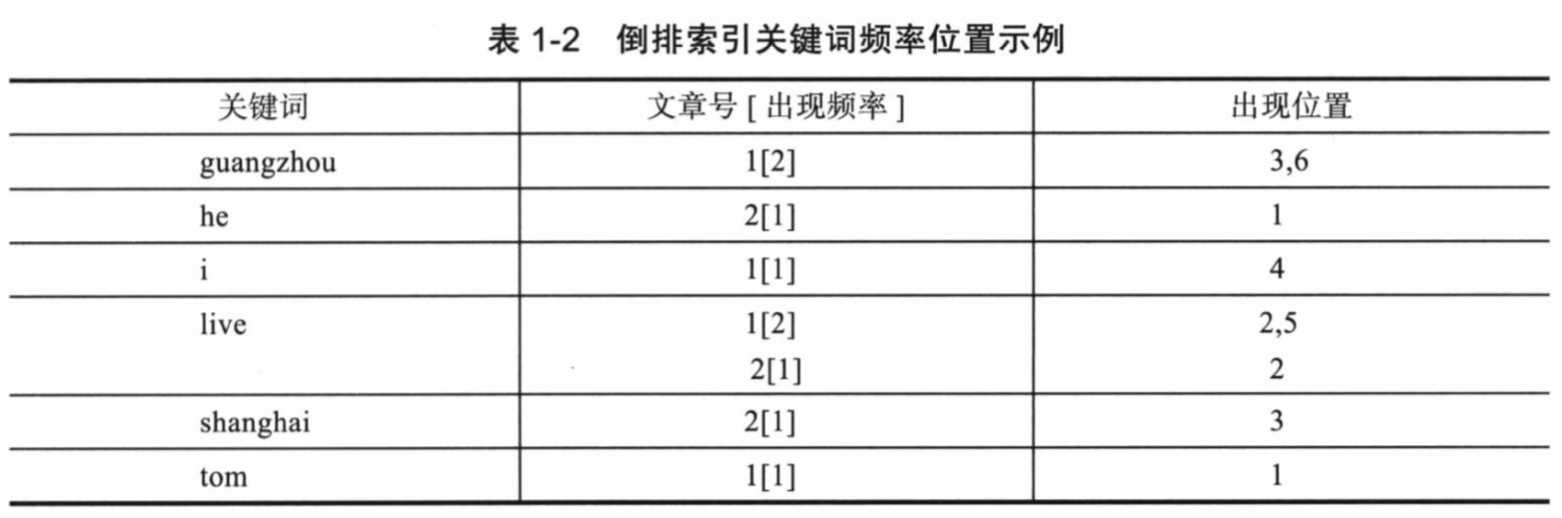
以上就是Lucene索引结构中最核心的部分,关键字是按字符顺序排列的(Lucene没有使用B树结构),因此Lucene可以使用二元搜索算法快速定位关键词。

4.3 实现

Lucene将上面三列分别作为词典文件(Term Dictionary)、频率文件(frequencies)、位置文件(positions)保存。其中词典文件不仅保存了每个关键词,还保留了指向频率文件和位置文件的指针,通过指针可以找到该关键字的频率信息和位置信息。

Lucene中使用了field的概念,用于表达信息所在的位置(如标题中、文章中、url中),在建索引中,该field信息也记录在词典文件中,每个关键词都有一个field信息,因为每个关键字一定属于一个或多个field。

4.4 压缩算法

为了减小索引文件的大小,Lucene对索引还是用了压缩技术。
首先,对词典文件中的关键词进行压缩,关键词压缩为<前缀长度,后缀>,例如:当前词为”阿拉伯语“,上一个词为”阿拉伯“,那么”阿拉伯语“压缩为<3,语>。
其次大量用到的是对数字的压缩,数字只保存与上一个值的差值(这样可以减少数字的长度,进而减少保存该数字需要的字节数)。例如当前文章号是16389(不压缩要用3个字节),上一文章号是16382,压缩后保存7(只用一个字节)。

压缩算法推荐阅读:https://www.cnblogs.com/dreamroute/p/8484457.html

4.5 实战

查询单词”live“,Lucene先对词典二元查找,找到该词,通过指向频率文件的指针读出所有文章号,然后返回结果。词典通常非常小,可以达到毫秒级返回。而用普通的顺序匹配算法,不建立索引,而是对所有文章的内容进行字符串匹配,过程是很缓慢的,当数据量很大时,耗时更加严重。

5. 基础概念

5.1 索引词(term)

Elasticsearch中能够被索引的精确值。foo、Foo、FOO几个单词是不同的索引词。索引词可以通过term查询进行准确的搜索。

5.2 文本(text)

文本会被拆分成一个个索引词存储在索引库中,为后续搜索提供支持。

5.3 分析(analysis)

分析是将文本转换为索引词的过程,其结果依赖于分词器。

5.4 集群(cluster)

集群由一个或多个节点组成,对外提供服务。Elasticsearch节点如果有相同的集群名称会自动加入到同一个集群,因此如果你拥有多个独立集群,每个集群都要设置不同的名称。

5.5 节点(node)

节点是一个逻辑上独立的服务,是集群的一部分,可以存储数据,并参与集群的索引和搜索功能。

5.6 路由(routing)

文档存储时是通过散列值进行计算,最终选择存储在主分片中,这个值默认是由文档的ID生成。

5.7 分片(shard)

分片是单个Lucene实例,是Elasticsearch管理的比较底层的功能。当索引占用空间很大超过一个节点的物理存储,Elasticsearch将索引切分成多个分片,分散在不同的物理节点上,以解决单物理节点存储空间有限的问题。

5.8 主分片(primary shard)

每个文档都存储在一个分片中,存储文档时系统会首先存储在主分片中,然后复制到不同的副本中。默认情况下一个索引拥有5个主分片,分片一旦建立,主分片数量就无法修改。

5.9 副本分片(replica shard)

每个主分片有零个或多个副本,是主分片的复制,其主要目的是:

  1. 增加高可用性:当主分片失败时,某一副本分片提升为主分片
  2. 提高性能:副本分片数量可以动态配置,可以为主分片分担查询压力。
  3. 允许水平分割扩展数据
  4. 允许分配和并行操作,从而提高性能和吞吐量。

5.10 复制(replica)

主分片的数据会复制到副本分片中,这样避免了单点问题,当某个节点发生故障,复制可以对故障进行转移,保证系统的高可用。

5.11 索引(index)

索引是具有相同结构的文档合集。

5.12 类型(type)

一个索引可以定义一个或多个类型,类型是索引的逻辑分区。

5.13 文档(document)

文档是存储在Elasticsearch中的一个JSON格式的字符串,就像关系数据库中表的一行记录。

5.14 映射(mapping)

映射像关系数据库中的表结构,每个索引都有一个映射,它定义了索引中的每一个字段类型。映射可以事先被定义,也可以在第一次存储文档时被自动识别。

5.15 字段(field)

文档中包含零个或多个字段,字段可以是一个简单的值,也可以是一个数组或对象的嵌套结构。字段类似于关系数据库中表的列,每个字段都对应一个字段类型。

5.16 来源字段(source field)

默认情况下源文档将被存储在_source字段中,查询时返回该字段。

5.17 主键(ID)

ID是文件的唯一标识,如果未指定,系统会自动生成一个ID,文档的index/type/id必须是唯一的。

5.18 Elasticsearch核心概念 vs. 数据库核心概念

Elasticsearch 数据库
Document row 行
Type table 表
Index database 库

Tips

本文同步发表在公众号,欢迎大家关注!😁
后续笔记欢迎关注获取第一时间更新!

《Java 8 in Action》Chapter 12:新的日期和时间API

  • 在Java 1.0中,对日期和时间的支持只能依赖java.util.Date类。同时这个类还有两个很大的缺点:年份的起始选择是1900年,月份的起始从0开始。
  • 在Java 1.1中,Date类中的很多方法被废弃,取而代之的是java.util.Calendar类。然而Calendar类也有类似的问题和设计缺陷,导致使用这些方法写出的代码非常容易出错。

DateFormat方法也有它自己的问题。比如,它不是线程安全的。这意味着两个线程如果尝试使用同一个formatter解析日期,你可能会得到无法预期的结果。

1. 使用LocalDate 和LocalTime

1.1 LocalDate

Java 8提供新的日期和时间API,LocalDate类实例是一个不可变对象,只提供简单的日期并且不含当天时间信息。此外也不附带任何与时区相关的信息。

通过静态工厂方法of创建一个LocalDate实例。LocalDate实例提供了多种方法来读取常用的值,比如年份、月份、星期几等,如下所示。

1
2
3
4
5
6
7
8
9
10
11
12
13
14
15
16
17
18
19
20
21
22
LocalDate localDate = LocalDate.of(2014, 3, 18);
int year = localDate.getYear();
Month month = localDate.getMonth();
int day = localDate.getDayOfMonth();
DayOfWeek dow = localDate.getDayOfWeek();
int len = localDate.lengthOfMonth();
boolean leap = localDate.isLeapYear();

// 使用工厂方法从系统时钟中获取当前的日期
LocalDate today = LocalDate.now();

System.out.println(String.format("year:%s\nmonth:%s\nday:%s\ndow:%s\nlen:%s\nleap:%s", year, month, day, dow, len, leap));
System.out.println(today);

结果:
year:2014
month:MARCH
day:18
dow:TUESDAY
len:31
leap:false
2019-03-27

Java 8日期-时间类都提供了类似的工厂方法。通过传递TemporalField参数给get方法拿到同样的信息。TemporalField接口定义了如何访问temporal对象某个字段的值。ChronoField枚举实现TemporalField接口,可以使用get方法得到枚举元素的值。

1
2
3
int year = localDate.get(ChronoField.YEAR);
int month = localDate.get(ChronoField.MONTH_OF_YEAR);
int day = localDate.get(ChronoField.DAY_OF_MONTH);

1.2 LocalTime

使用LocalTime类表示时间,可以使用of重载的两个工厂方法创建LocalTime的实例。

  • 第一个重载函数接收小时和分钟
  • 第二个重载函数同时还接收秒。

LocalTime类也提供了一些get方法访问这些变量的值,如下所示。

1
2
3
4
5
6
7
8
9
10
LocalTime localTime = LocalTime.of(13, 45, 20);
int hour = localTime.getHour();
int minute = localTime.getMinute();
int second = localTime.getSecond();
System.out.println(String.format("hour:%s\nminute:%s\nsecond:%s", hour, minute, second));

打印结果:
hour:13
minute:45
second:20

LocalDate和LocalTime都可以通过解析代表它们的字符串创建。使用静态方法parse可以实现:

1
2
LocalDate date = LocalDate.parse("2019-03-27");
LocalTime time = LocalTime.parse("20:17:08");

可以向parse方法传递一个DateTimeFormatter。该类的实例定义了如何格式化一个日期或者时间对象。用来替换老版java.util.DateFormat。
如果传递的字符串参数无法被解析为合法的LocalDate或LocalTime对象,这两个parse方法都会抛出一个继承自RuntimeException的DateTimeParseException异常。

2. 合并日期和时间

复合类LocalDateTime,是LocalDate和LocalTime的合体。它同时表示了日期和时间,不带有时区信息。可以直接创建,也可以通过合并日期和时间对象构造。

1
2
3
4
5
6
7
8
LocalTime time = LocalTime.of(21, 31, 50);
LocalDate date = LocalDate.of(2019, 03, 27);

LocalDateTime dt1 = LocalDateTime.of(2017, Month.NOVEMBER, 07, 22, 31, 51);
LocalDateTime dt2 = LocalDateTime.of(date, time);
LocalDateTime dt3 = date.atTime(22, 21, 14);
LocalDateTime dt4 = date.atTime(time);
LocalDateTime dt5 = time.atDate(date);

创建LocalDateTime对象

  • 直接创建
  • 通过atTime方法向LocalDate传递一个时间对象
  • 通过atDate方法向LocalTime传递一个时间对象

也可以使用toLocalDate或者toLocalTime方法,从LocalDateTime中提取LocalDate或者LocalTime组件:

1
2
LocalDate date1 = dt1.toLocalDate();
LocalTime time1 = dt1.toLocalTime();

3. 机器的日期和时间格式

从计算机的角度来看,”2019年03月27日11:20:03”这样的方式是不容易理解的,计算机更加容易理解建模时间最自然的格式是表示一个持续时间段上某个点的单一大整型数。新的java.time.Instant类对时间建模的方式,基本上它是以Unix元年时间(传统的设定为UTC时区1970年1月1日午夜时分)开始所经历的秒数进行计算。

3.1 创建Instant

  • 静态工厂方法ofEpochSecond传递一个代表秒数的值创建一个该类的实例。
  • 静态工厂方法ofEpochSecond还有一个增强的重载版本,它接收第二个以纳秒为单位的参数值,对传入作为秒数的参数进行调整。重载的版本会调整纳秒参数,确保保存的纳秒分片在0到999 999999之间。
1
2
3
4
5
6
Instant.ofEpochSecond(3);
Instant.ofEpochSecond(3, 0);
// 2 秒之后再加上100万纳秒(1秒)
Instant.ofEpochSecond(2, 1_000_000_000);
// 4秒之前的100万纳秒(1秒)
Instant.ofEpochSecond(4, -1_000_000_000);

3.2 工厂方法now

Instant类也支持静态工厂方法now,它能够获取当前时刻的时间戳。

1
2
3
4
Instant now = Instant.now();
System.out.println(now);

2019-03-27T03:26:39.451Z

Instant的设计初衷是为了便于机器使用,它包含的是由秒及纳秒所构成的数字。因此Instant无法处理那些我们非常容易理解的时间单位。

1
2
3
4
5
int day = Instant.now().get(ChronoField.DAY_OF_MONTH);
它会抛出下面这样的异常:

Exception in thread "main" java.time.temporal.UnsupportedTemporalTypeException: Unsupported field: DayOfMonth
但是你可以通过Duration和Period类使用Instant,接下来我们会对这部分内容进行介绍。

4. Duration和Period

4.1 Duration

所有类都实现了Temporal接口,该接口定义如何读取和操纵为时间建模的对象的值。如果需要创建两个Temporal对象之间的duration,就需要Duration类的静态工厂方法between。
可以创建两个LocalTimes对象、两个LocalDateTimes对象,或者两个Instant对象之间的duration:

1
2
3
4
5
6
7
8
9
10
11
12
13
14
15
16
LocalTime time1 = LocalTime.of(21, 50, 10);
LocalTime time2 = LocalTime.of(22, 50, 10);
LocalDateTime dateTime1 = LocalDateTime.of(2019, 03, 27, 21, 20, 40);
LocalDateTime dateTime2 = LocalDateTime.of(2019, 03, 27, 21, 20, 40);
Instant instant1 = Instant.ofEpochSecond(1000 * 60 * 2);
Instant instant2 = Instant.ofEpochSecond(1000 * 60 * 3);

Duration d1 = Duration.between(time1, time2);
Duration d2 = Duration.between(dateTime1, dateTime2);
Duration d3 = Duration.between(instant1, instant2);
// PT1H 相差1小时
System.out.println("d1:" + d1);
// PT2H 相差2小时
System.out.println("d2:" + d2);
// PT16H40M 相差16小时40分钟
System.out.println("d3:" + d3);

LocalDateTime是为了便于人阅读使用,Instant是为了便于机器处理,所以不能将二者混用。如果在这两类对象之间创建duration,会触发一个DateTimeException异常。
此外,由于Duration类主要用于以秒和纳秒衡量时间的长短,你不能仅向between方法传递一个LocalDate对象做参数。

4.2 Period

使用Period类以年、月或者日的方式对多个时间单位建模。使用该类的工厂方法between,可以使用得到两个LocalDate之间的时长。

1
2
3
Period period = Period.between(LocalDate.of(2019, 03, 7), LocalDate.of(2019, 03, 17));
// 相差10天
System.out.println("Period between:" + period);

Duration和Period类都提供了很多非常方便的工厂类,直接创建对应的实例。

1
2
3
4
5
6
7
Duration threeMinutes = Duration.ofMinutes(3);
Duration fourMinutes = Duration.of(4, ChronoUnit.MINUTES);

Period tenDay = Period.ofDays(10);
Period threeWeeks = Period.ofWeeks(3);
Period twoYearsSixMonthsOneDay = Period.of(2, 6, 1);
Duration类和Period类共享了很多相似的方法,有兴趣的可以参考官网的文档。

截至目前,我们介绍的这些日期-时间对象都是不可修改的,这是为了更好地支持函数式编程,确保线程安全,保持领域模式一致性而做出的重大设计决定。
当然,新的日期和时间API也提供了一些便利的方法来创建这些对象的可变版本。比如,你可能希望在已有的LocalDate实例上增加3天。除此之外,我们还会介绍如何依据指定的模式,
比如dd/MM/yyyy,创建日期-时间格式器,以及如何使用这种格式器解析和输出日期。

5. 操纵、解析和格式化日期

如果已经有一个LocalDate对象,想要创建它的一个修改版,最直接也最简单的方法是使用withAttribute方法。withAttribute方法会创建对象的一个副本,并按照需要修改它的属性。

1
2
3
4
5
// 这段代码中所有的方法都返回一个修改了属性的对象。它们都不会修改原来的对象!
LocalDate date1 = LocalDate.of(2017, 12, 15);
LocalDate date2 = date1.withYear(2019);
LocalDate date3 = date2.withDayOfMonth(25);
LocalDate date4 = date3.with(ChronoField.MONTH_OF_YEAR, 9);

它们都声明于Temporal接口,所有的日期和时间API类都实现这两个方法,它们定义了单点的时间,比如LocalDate、LocalTime、LocalDateTime以及Instant。更确切地说,使用get和with方法,我们可以将Temporal对象值的读取和修改区分开。如果Temporal对象不支持请求访问的字段,它会抛出一个UnsupportedTemporalTypeException异常,比如试图访问Instant对象的ChronoField.MONTH_OF_YEAR字段,或者LocalDate对象的ChronoField.NANO_OF_SECOND字段时都会抛出这样的异常。

1
2
3
4
5
// 以声明的方式操纵LocalDate对象,可以加上或者减去一段时间
LocalDate date1 = LocalDate.of(2014, 10, 19);
LocalDate date2 = date1.plusWeeks(1);
LocalDate date3 = date2.minusYears(3);
LocalDate date4 = date3.plus(6, ChronoUnit.MONTHS);

与我们刚才介绍的get和with方法类似最后一行使用的plus方法也是通用方法,它和minus方法都声明于Temporal接口中。通过这些方法,对TemporalUnit对象加上或者减去一个数字,我们能非常方便地将Temporal对象前溯或者回滚至某个时间段,通过ChronoUnit枚举我们可以非常方便地实现TemporalUnit接口。

6. 使用TemporalAdjuster

有时需要进行一些更加复杂的操作,比如,将日期调整到下个周日、下个工作日,或者是本月的最后一天。可以使用重载版本的with方法,向其传递一个提供了更多定制化选择的TemporalAdjuster对象,更加灵活地处理日期。

1
2
3
4
// 对于最常见的用例,日期和时间API已经提供了大量预定义的TemporalAdjuster。可以通过TemporalAdjuster类的静态工厂方法访问。
LocalDate date1 = LocalDate.of(2013, 12, 11);
LocalDate date2 = date1.with(TemporalAdjusters.nextOrSame(DayOfWeek.MONDAY));
LocalDate date3 = date2.with(TemporalAdjusters.lastDayOfMonth());

使用TemporalAdjuster可以进行更加复杂的日期操作,方法的名称很直观。如果没有找到符合预期的预定义的TemporalAdjuster,可以创建自定义的TemporalAdjuster。TemporalAdjuster接口只声明一个方法(即函数式接口)。实现该接口需要定义如何将一个Temporal对象转换为另一个Temporal对象,可以把它看成一个UnaryOperator

1
2
3
4
@FunctionalInterface
public interface TemporalAdjuster {
Temporal adjustInto(Temporal temporal);
}

7. 打印输出及解析日期-时间对象

新的java.time.format包就是特别为格式化以及解析日期-时间对象而设计的。其中最重要的类是DateTimeFormatter。创建格式器最简单的方法是通过它的静态工厂方法以及常量。所有的DateTimeFormatter实例都能用于以一定的格式创建代表特定日期或时间的字符串。

1
2
3
4
5
6
LocalDate date = LocalDate.of(2013, 10, 11);
String s1 = date.format(DateTimeFormatter.BASIC_ISO_DATE);
String s2 = date.format(DateTimeFormatter.ISO_LOCAL_DATE);

20131011
2013-10-11

通过解析代表日期或时间的字符串重新创建该日期对象,也可以使用工厂方法parse重新创建。

1
2
LocalDate date2 = LocalDate.parse("20141007", DateTimeFormatter.BASIC_ISO_DATE);
LocalDate date3 = LocalDate.parse("2014-10-07", DateTimeFormatter.ISO_LOCAL_DATE);

DateTimeFormatter实例是线程安全的,老的java.util.DateFormat线程不安全。单例模式创建格式器实例,在多个线程间共享实例是没有问题的。也可以通过ofPattern静态工厂方法,按照某个特定的模式创建格式器。

1
2
3
DateTimeFormatter formatter = DateTimeFormatter.ofPattern("dd/MM/yyyy");
String formattedDateStr = date.format(formatter);
LocalDate date1 = LocalDate.parse(formattedDateStr, formatter);

ofPattern方法也提供了一个重载的版本,可以传入Locale创建格式器。

1
2
3
4
DateTimeFormatter italianFormatter = DateTimeFormatter.ofPattern("d. MMMM yyyy", Locale.ITALIAN);
LocalDate date = LocalDate.of(2015, 11, 14);
String formattedDate = date.format(italianFormatter);
LocalDate date1 = LocalDate.parse(formattedDate, italianFormatter);

DateTimeFormatterBuilder类还提供了更复杂的格式器,以提供更加细粒度的控制。同时也提供非常强大的解析功能,比如区分大小写的解析、柔性解析、填充,以及在格式器中指定可选节等等。

通过DateTimeFormatterBuilder自定义格式器

1
2
3
4
5
6
7
8
9
10
DateTimeFormatter italianFormatter = new DateTimeFormatterBuilder()
.appendText(ChronoField.DAY_OF_MONTH)
.appendLiteral(". ")
.appendText(ChronoField.MONTH_OF_YEAR)
.appendLiteral(" ")
.appendText(ChronoField.YEAR)
.parseCaseInsensitive()
.toFormatter(Locale.ITALIAN);
LocalDate now = LocalDate.now();
String s = now.format(italianFormatter);

8. 处理不同的时区和历法

新版日期和时间API新增加的重要功能是时区的处理。新的java.time.ZoneId类替代老版java.util.TimeZone。跟其他日期和时间类一样,ZoneId类也是无法修改的。是按照一定的规则将区域划分成的标准时间相同的区间。在ZoneRules这个类中包含了40个时区实例,可以通过调用ZoneId的getRules()得到指定时区的规则,每个特定的ZoneId对象都由一个地区ID标识。

1
ZoneId shanghaiZone = ZoneId.of("Asia/Shanghai");

Java 8的新方法toZoneId将一个老的时区对象转换为ZoneId。地区ID都为“{区域}/{城市}”的格式,地区集合的设定都由英特网编号分配机构(IANA)的时区数据库提供。

1
ZoneId zoneId = TimeZone.getDefault().toZoneId();

ZoneId对象可以与LocalDate、LocalDateTime或者是Instant对象整合构造为成ZonedDateTime实例,它代表了相对于指定时区的时间点。

1
2
3
4
5
6
7
8
9
10
11
12
13
14
15
16
LocalDate date = LocalDate.of(2019, 03, 27);
ZonedDateTime zdt1 = date.atStartOfDay(shanghaiZone);

LocalDateTime dateTime = LocalDateTime.of(2015, 12, 21, 11, 11, 11);
ZonedDateTime zdt2 = dateTime.atZone(shanghaiZone);

Instant instant = Instant.now();
ZonedDateTime zdt3 = instant.atZone(shanghaiZone);
通过ZoneId,你还可以将LocalDateTime转换为Instant:

LocalDateTime dateTime = LocalDateTime.of(2016, 10, 14, 15, 35);
Instant instantFromDateTime = dateTime.toInstant(shanghaiZone);
你也可以通过反向的方式得到LocalDateTime对象:

Instant instant = Instant.now();
LocalDateTime timeFromInstant = LocalDateTime.ofInstant(instant, shanghaiZone);

另一种比较通用的表达时区的方式是利用当前时区和UTC/格林尼治的固定偏差。使用ZoneId的一个子类ZoneOffset,表示的是当前时间和伦敦格林尼治子午线时间的差异:

1
ZoneOffset newYorkOffset = ZoneOffset.of("-05:00");

9. 总结

  • Java 8之前老版的java.util.Date类以及其他用于建模日期时间的类有很多不一致及设计上的缺陷,包括易变性以及糟糕的偏移值、默认值和命名。
  • 新版的日期和时间API中,日期-时间对象是不可变的。
  • 新的API提供了两种不同的时间表示方式,有效地区分了运行时人和机器的不同需求。
  • 你可以用绝对或者相对的方式操纵日期和时间,操作的结果总是返回一个新的实例,老的日期时间对象不会发生变化。
  • TemporalAdjuster让你能够用更精细的方式操纵日期,不再局限于一次只能改变它的一个值,并且你还可按照需求定义自己的日期转换器。
  • 你现在可以按照特定的格式需求,定义自己的格式器,打印输出或者解析日期时间对象。这些格式器可以通过模板创建,也可以自己编程创建,并且它们都是线程安全的。
  • 你可以用相对于某个地区/位置的方式,或者以与UTC/格林尼治时间的绝对偏差的方式表示时区,并将其应用到日期时间对象上,对其进行本地化。

资源获取

  • 公众号回复 : Java8 即可获取《Java 8 in Action》中英文版!

Tips

  • 欢迎收藏和转发,感谢你的支持!(๑•̀ㅂ•́)و✧
  • 欢迎关注我:后端小哥,专注后端开发,希望和你一起进步!