Volley学习第三篇-网络线程

前文概要

其实NetworkDispatcherCacheDispatcher是很相像的.感觉看NetworkDispatcher要比CacheDispatcher要简单.

因为它不需要进行判断缓存的过期时间和新鲜时间,仅仅是执行请求,然后在缓存响应结果,所以要简单些.

流程分析

同样的继承Thread,只看run()方法里面的就好了

同样的死循环,队列无内容时阻塞

  • 1.首先从队列中取出Request请求

    request = mQueue.take();
  • 2.判断请求是否取消

    if (request.isCanceled()) {
        request.finish("network-discard-cancelled");
        continue;
    }
  • 3.请求未取消,执行网络请求并得到NetworkResponse对象

    NetworkResponse networkResponse = mNetwork.performRequest(request);

    具体的网络请求还是需要看Network接口的实现类中是如何操作的.

  • 4.判断服务器返回码是否是304(资源未更新)

    if (networkResponse.notModified && request.hasHadResponseDelivered()) {
        request.finish("not-modified");
        continue;
    }
  • 5.是否缓存请求的响应

    if (request.shouldCache() && response.cacheEntry != null) {
        mCache.put(request.getCacheKey(), response.cacheEntry);
        request.addMarker("network-cache-written");
    }
  • 6.分发

    mDelivery.postResponse(request, response);

小结

其实看明白先前的缓存线程之后,理解网络线程也不是难事了.

明天详细解释下具体响应的转化和分发流程.

Volley学习第二篇-缓存流程

前文概要

上篇说道Volley初始化的时候需要创建一个RequestQueue消息队列,下面就来看看这个RequestQueue.

RequestQueue

是一个队列管理器,里面维护了两个队列—CacheQueueNetowrkQueue.

Volley类里面的newRequestQueue方法中调用了队列的start()方法,就从这个方法入手.

public void start() {
    stop();  // Make sure any currently running dispatchers are stopped.
    // Create the cache dispatcher and start it.
    mCacheDispatcher = new CacheDispatcher(mCacheQueue, mNetworkQueue, mCache, mDelivery);
    mCacheDispatcher.start();

    // 这里默认创建4个线程
    // Create network dispatchers (and corresponding threads) up to the pool size.
    for (int i = 0; i < mDispatchers.length; i++) {
        NetworkDispatcher networkDispatcher = new NetworkDispatcher(mNetworkQueue, mNetwork,
                mCache, mDelivery);
        mDispatchers[i] = networkDispatcher;
        networkDispatcher.start();
    }
}

这里创建了1个CacheDispatcher和4个NetworkDispatcher.CacheDispatcher和4个NetworkDispatcher都是继承了Thread的两个线程,一个是缓存线程,另一个是网络线程.

其中DEFAULT_NETWORK_THREAD_POOL_SIZE中定义了网络线程的个数,可以根据不同的cpu核数来自定义开多少个网络线程(线程数 = cpu核数 * 2 + 1).

CacheDispatcher缓存线程的流程

它继承了Thread,所以只需要看它的run()方法就好了.

while (true) {
    try {
        // Get a request from the cache triage queue, blocking until
        // at least one is available.从缓存队列中不停的取出request,直到队列中只有一个请求的时候阻塞
        final Request request = mCacheQueue.take();
        request.addMarker("cache-queue-take");

        // If the request has been canceled, don't bother dispatching it.
        if (request.isCanceled()) {
            request.finish("cache-discard-canceled");
            continue;// 请求取消就不读缓存了
        }

        // Attempt to retrieve this item from cache. 从缓存中获取缓存信息的实体
        Cache.Entry entry = mCache.get(request.getCacheKey());
        if (entry == null) {
            request.addMarker("cache-miss");
            // Cache miss; send off to the network dispatcher.
            mNetworkQueue.put(request);// 缓存木有,将请求添加到网络请求队列
            continue;
        }

        // If it is completely expired 过期, just send it to the network.
        if (entry.isExpired()) {
            request.addMarker("cache-hit-expired");
            request.setCacheEntry(entry);
            mNetworkQueue.put(request);// 缓存过期,添加到网络请求队列
            continue;
        }

        // We have a cache hit; parse its data for delivery back to the request.
        request.addMarker("cache-hit");
        // 解析网络数据  这个是由请求对象request来解析的
        // 文档中说道:request对象负责请求和解析网络请求
        Response<?> response = request.parseNetworkResponse(
                new NetworkResponse(entry.data, entry.responseHeaders));
        request.addMarker("cache-hit-parsed");

        if (!entry.refreshNeeded()) {// 缓存是否需要刷新
            // Completely unexpired cache hit. Just deliver the response.
            mDelivery.postResponse(request, response);// 无需刷新,直接分发
        } else {
            // Soft-expired cache hit. We can deliver the cached response,
            // but we need to also send the request to the network for
            // refreshing.
            request.addMarker("cache-hit-refresh-needed");
            request.setCacheEntry(entry);// 更新缓存

            // Mark the response as intermediate.// 中间  媒介
            response.intermediate = true;

            // Post the intermediate response back to the user and have
            // the delivery then forward the request along to the network.
            mDelivery.postResponse(request, response, new Runnable() {
                @Override
                public void run() {
                    try {
                        mNetworkQueue.put(request);
                    } catch (InterruptedException e) {
                        // Not much we can do about this.
                    }
                }
            });
        }

    } catch (InterruptedException e) {
        // We may have been interrupted because it was time to quit.
        if (mQuit) {
            return;
        }
        continue;
    }
}

缓存的主体流程就在这个死循环里面,Volley的dispatcher的原理和Handler里面的looper的原理非常相似.

读取缓存分发到主线程

Response<?> response = request.parseNetworkResponse(new NetworkResponse(entry.data, entry.responseHeaders));
request.addMarker("cache-hit-parsed");

if (!entry.refreshNeeded()) {
    // Completely unexpired cache hit. Just deliver the response.
    mDelivery.postResponse(request, response);
} else {
    // Soft-expired cache hit. We can deliver the cached response,
    // but we need to also send the request to the network for
    // refreshing.
    request.addMarker("cache-hit-refresh-needed");
    request.setCacheEntry(entry);

    // Mark the response as intermediate.// 中间  媒介
    response.intermediate = true;

    // Post the intermediate response back to the user and have
    // the delivery then forward the request along to the network.
    mDelivery.postResponse(request, response, new Runnable() {
        @Override
        public void run() {
            try {
                mNetworkQueue.put(request);
            } catch (InterruptedException e) {
                // Not much we can do about this.
            }
        }
    });
}

详解

request.parseNetworkResponse(new NetworkResponse(entry.data, entry.responseHeaders));`

entry.data是缓存的原始的byte数组,将byte数组响应头封装成一个NetworkResponse对象(Volley里面的网络响应的统一对象).
parseNetworkResponse()方法将NetworkResponse对象解析成Response供各种泛型的转换.

mDelivery.postResponse(request, response);

mDelivery对象时在CacheDispatcher的构造方法的时候赋值的,往上找找RequestQueue中的start()方法中mCacheDispatcher = new CacheDispatcher(mCacheQueue, mNetworkQueue, mCache, mDelivery);

继续找

public RequestQueue(Cache cache, Network network, int threadPoolSize,ResponseDelivery delivery) {
    mCache = cache;
    mNetwork = network;
    mDispatchers = new NetworkDispatcher[threadPoolSize];
    mDelivery = delivery;
}

还找

public RequestQueue(Cache cache, Network network, int threadPoolSize) {
    this(cache, network, threadPoolSize,
            new ExecutorDelivery(new Handler(Looper.getMainLooper())));
}

看mDelivery就是new ExecutorDelivery(new Handler(Looper.getMainLooper()))

ExecutorDelivery中构造方法中有一个非常重要的一行

public ExecutorDelivery(final Handler handler) {
    // Make an Executor that just wraps the handler.
    mResponsePoster = new Executor() {
        @Override
        public void execute(Runnable command) {
            handler.post(command);
        }
    };
}

handlerrunnable对象post出去,而handler是通过Looper.getMainLooper创建的,这样就是通过我们用主线程创建的Handler将响应发送到主线程中了.

至此,Volley缓存的读取/分发就完成了.

总结


官方图解中的绿色的那部分—缓存线程的流程就结束了.

后面我会慢慢肥西网络线程相关的东西.

Volley学习第一篇-框架入口.md

前文概要

这是我的Volley学习第一篇的笔记.
看了一个星期的各类教程之后的总结,准备把Volley的整体流程都总结一遍,同时会对Volley进行一些扩展,最后会跟着大神的脚步模仿一个Volley出来.

水平有限,望多指教.

资源

创建全局的RequestQueue

使用Volley的时候会创建一个全局的RequestQueue,一般会在自定义的Application类里面创建.

RequestQueue requestQueue = Volley.newRequestQueue(appContext);

Volley框架的入口点

这里我们就发现原来Volley的入口是Volley类里面的一个静态方法newRequestQueue()

public static RequestQueue newRequestQueue(Context context) {
    return newRequestQueue(context, null);
}

Volley框架的真正的入口

这是一个参数的方法,会调用两个参数的newRequestQueue方法,传入一个默认的null.

public static RequestQueue newRequestQueue(Context context, HttpStack stack) {

    File cacheDir = new File(context.getCacheDir(), DEFAULT_CACHE_DIR);

    String userAgent = "volley/0";
    try {
        String packageName = context.getPackageName();
        PackageInfo info = context.getPackageManager().getPackageInfo(packageName, 0);
        userAgent = packageName + "/" + info.versionCode;
    } catch (NameNotFoundException e) {
    }

    if (stack == null) {
        if (Build.VERSION.SDK_INT >= 9) {
            stack = new HurlStack();
        } else {
            // Prior to Gingerbread, HttpUrlConnection was unreliable.
            // See: http://android-developers.blogspot.com/2011/09/androids-http-clients.html
            stack = new HttpClientStack(AndroidHttpClient.newInstance(userAgent));
        }
    }

    Network network = new BasicNetwork(stack);

    RequestQueue queue = new RequestQueue(new DiskBasedCache(cacheDir), network);
    queue.start();

    return queue;
}

这里才是真正的创建RequestQueue的地方,因为传入的第二个参数是null,所以stack== null是成立的,这是就会根据不同的系统版本创建不同的HttpStack子类的实例对象,然后将它包装成BasicNetwork对象.

同时第一行的时候就创建了Volley的缓存目录(当然你可以根据你的需求随意更改缓存目录的位置),并将缓存目录包装成一个DiskBasedCache对象.

至此,RequestQueue需要的缓存和网络请求对象就创建成功了,然后我们的RequestQueue请求队列就创建成功了.

通过start()方法就启动了我们的请求队列.

小结

两个newRequestQueue方法使用的这种方式其实非常巧妙,以前我看到这种方式就叫他重载调用(不知道叫的对不对,哈哈).

这是我的Volley系列的第一篇,好的开始,加油↖(^ω^)↗!

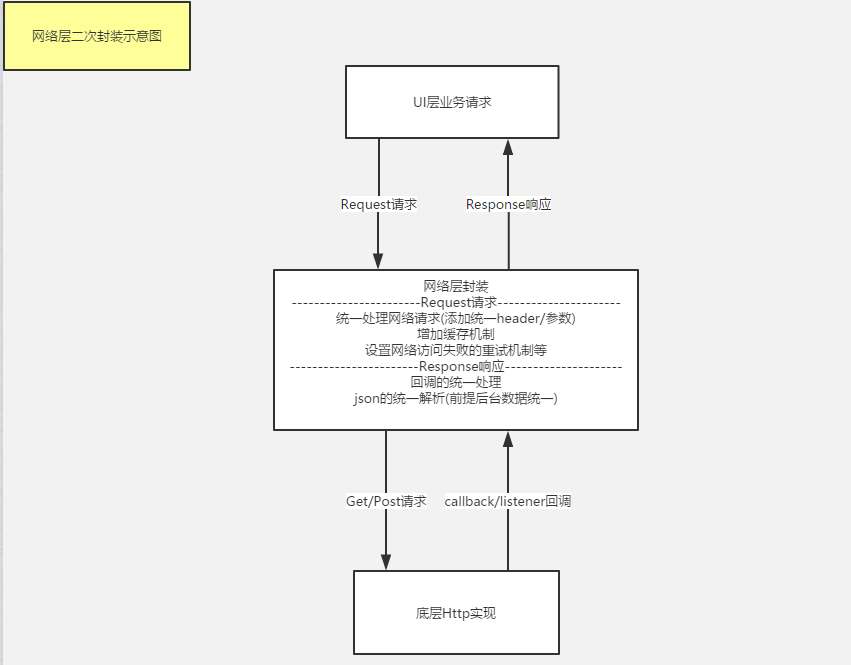
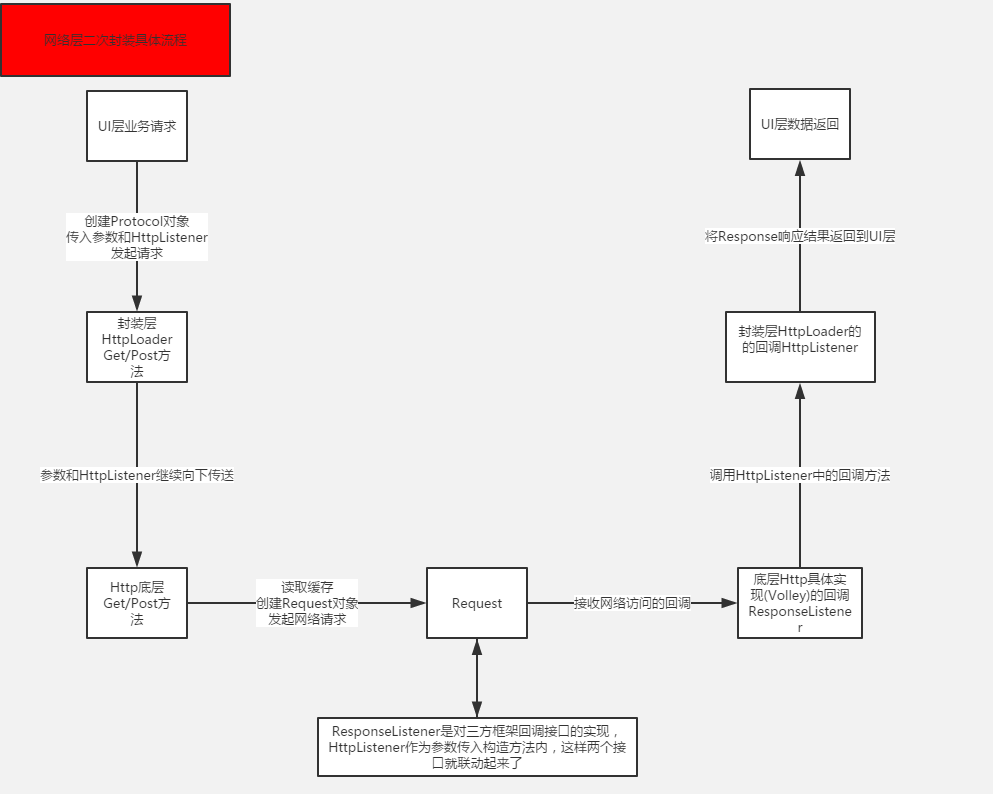
Android网络层二次封装

项目介绍

对Volley进行二次封装,方便使用和扩展。主要是学习封装的思想。

该示例主体代码来自传智的某位Android讲师,具体不清楚。

网络层封装示意图

网络层二次封装示意图.png
网络层二次封装具体流程.png


接下来前期准备

public class App extends Application {
    public static Context application;
    public static HttpLoader HL;

    @Override
    public void onCreate() {
        super.onCreate();
        application = this;

        // 初始化网络请求相关的核心类
        HL = HttpLoader.getInstance(this);
    }
}

不用我介绍了吧,记得在AndroidManiFest文件中添加name属性&&&&&&&联网权限

1.Activity实现HttpListener接口

HttpListener是我们连接网络层和UI层的桥梁,记得重写接口中的成功和失败的方法。

2.创建Protocol类发起网络请求

new MainProtocol(MainActivity.this,"15613566958").doRequest(this);

这样我们就发起了一个网络请求,感觉简单了好多。

具体MainProtocol的具体实现

public class MainProtocol extends BaseProtrocol {
    private String phone;
    private Context actContext;
    // 传入必备参数
    public MainProtocol(Context actContext,String phone) {
        this.actContext = actContext;
        this.phone = phone;
    }

    @Override
    public void doRequest(HttpLoader loader, HttpLoader.HttpListener listener) {
        HttpParams params = new HttpParams().put("phone", phone);
        // 发起GET请求
        loader.get(actContext, AppConstants.URL_COUPONS, params, AppConstants.REQUEST_CODE_COUPONS, listener);
    }
}

3.HttpLoader–网络请求类

单例类,不要问我为什么,这是网络请求的类啊,能不单利吗!!!!

其中mRequestQueue是保存请求队列的,mInFlightRequests是用来保存已经等待的请求,同时具有过滤重复请求的功能。

get方法会调用request方法,这里才是请求的主体,request方法在发起请求前会通过tryLoadCacheResponse方法首先读取缓存,然后在进行访问网络的操作。然后根据返回结果的不同,分别调用HttpListener的不同的回调方法,这样就把服务器的结果返回到UI层了。

/**
 * ResponseListener,封装了Volley的错误和成功的回调监听,并执行一些默认处理,同时会将事件通过HttpListener分发到UI层
 */
private class ResponseListener implements Response.ErrorListener, Response.Listener<String> {
    private HttpListener listener;
    private int requestCode;

    public ResponseListener(int requestCode, HttpListener listener) {
        this.listener = listener;
        this.requestCode = requestCode;
    }

    @Override
    public void onErrorResponse(VolleyError volleyError) {
        LLog.w("Request error from network!");
        volleyError.printStackTrace();
        mInFlightRequests.remove(requestCode);// 请求错误,从请求集合中删除该请求
        if (listener != null) {
            listener.onGetResponseError(requestCode, volleyError);
        }
    }

    @Override
    public void onResponse(String response) {
        mInFlightRequests.remove(requestCode);// 请求成功,从请求集合中删除该请求
        if (response != null) {
            //SystemClock.sleep(2000);
            LLog.i("Request success from network!");
            try {
                JSONObject jsonObject = new JSONObject(response);// 处理分发数据---解析json
                String status = jsonObject.getString("status");
                if (listener != null && response != null) {// 分发数据
                    if (("success".equals(status) || "ok".equals(status))) {
                        String data = null;
                        try {
                            data = jsonObject.getString("data");
                            listener.onGetResponseSuccess(requestCode, data);
                        } catch (Exception e) {
                            // 不是标准格式的时候就把原始数据传回去
                            listener.onGetResponseSuccess(requestCode, response);
                        }
                    } else if (("fail".equals(status) || "error".equals(status))) {
                        String errMsg = null;
                        try {
                            errMsg = jsonObject.getString("msg");
                        } catch (Exception e) {
                            errMsg = jsonObject.getString("message");
                        } finally {
                            listener.onGetResponseError(requestCode, new VolleyError(errMsg));
                        }
                    }
                }
            } catch (Exception e) {
                e.printStackTrace();
                listener.onGetResponseError(requestCode, new VolleyError("解析问题"));
            }
        }
    }
}

这之中ResponseListener是关键,他关联了三方框架的回调方法和HttpListener的回调方法。然后不要问我为嘛onResponse里面写了这么多,你是为了健壮性更好吗?

我能骂街吗?
后台返回数据是乱七八糟的好不?

小结

好了,到了这里你肯定还没有看懂,废话,我才写了几篇文章,哪有那么快就写的让你看懂。
如果你还没有看懂的话就看我的代码去吧,我不是链接

还是看不懂?

找我要视频啊~

看完了再看这几篇文章就好了 多搞搞就好了

Android网络基础

1.HttpClient

Apache提供的高效的网络访问模块。

Android 2.2(API 8)及以前使用HttpClient比价好,bug少。

但是在最新的Android版本中移除了,如果你还想使用这个,在build.gradle里面添加:

android {
    useLibrary 'org.apache.http.legacy'
}

具体使用方法:

String urlAddress = "http://192.168.1.102:8080/qualityserver/login.do";  
// 发送GET请求
public String doGet(String username,String password){  
    String getUrl = urlAddress + "?username="+username+"&password="+password;  
    HttpGet httpGet = new HttpGet(getUrl);  
    HttpParams hp = httpGet.getParams();  
    hp.getParameter("true");  
    HttpClient hc = new DefaultHttpClient();  
    try {  
        HttpResponse ht = hc.execute(httpGet);  
        if(ht.getStatusLine().getStatusCode() == HttpStatus.SC_OK){  
            HttpEntity he = ht.getEntity();  
            InputStream is = he.getContent();  
            BufferedReader br = new BufferedReader(new InputStreamReader(is));  
            String response = "";  
            String readLine = null;  
            while((readLine =br.readLine()) != null){  
                //response = br.readLine();  
                response = response + readLine;  
            }  
            is.close();  
            br.close();  

            //String str = EntityUtils.toString(he);  
            System.out.println("========="+response);  
            return response;  
        }else{  
            return "error";  
        }  
    } catch (ClientProtocolException e) {  
        e.printStackTrace();  
        return "exception";  
    } catch (IOException e) {  
        e.printStackTrace();  
        return "exception";  
    }      
}  

public String doPost(String username,String password){  
    //String getUrl = urlAddress + "?username="+username+"&password="+password;  
    HttpPost httpPost = new HttpPost(urlAddress);  
    List params = new ArrayList();  
    NameValuePair pair1 = new BasicNameValuePair("username", username);  
    NameValuePair pair2 = new BasicNameValuePair("password", password);  
    params.add(pair1);  
    params.add(pair2);  

    HttpEntity he;  
    try {  
        he = new UrlEncodedFormEntity(params, "gbk");  
        httpPost.setEntity(he);  

    } catch (UnsupportedEncodingException e1) { 
        e1.printStackTrace();  
    }   

    HttpClient hc = new DefaultHttpClient();  
    try {  
        HttpResponse ht = hc.execute(httpPost);  
        //连接成功  
        if(ht.getStatusLine().getStatusCode() == HttpStatus.SC_OK){  
            HttpEntity het = ht.getEntity();  
            InputStream is = het.getContent();  
            BufferedReader br = new BufferedReader(new InputStreamReader(is));  
            String response = "";  
            String readLine = null;  
            while((readLine =br.readLine()) != null){  
                //response = br.readLine();  
                response = response + readLine;  
            }  
            is.close();  
            br.close();  

            //String str = EntityUtils.toString(he);  
            System.out.println("=========&&"+response);  
            return response;  
        }else{  
            return "error";  
        }  
    } catch (ClientProtocolException e) {
        e.printStackTrace();  
        return "exception";  
    } catch (IOException e) {
        e.printStackTrace();  
        return "exception";  
    }     
}

2.HttpURLConnection

HttpURLConnection是一种多用途、轻量极的HTTP客户端,使用它来进行HTTP操作可以适用于大多数的应用程序。

注意事项

  1. HttpURLConnection在Android 2.2及以前有一些bug。
  2. 参看笔记:Android 4.0 Ice Cream Sandwich GET请求变POST请求

具体使用方法:

String urlAddress = "http://192.168.1.102:8080/AndroidServer/login.do";  
URL url;  
HttpURLConnection uRLConnection;  

//向服务器发送get请求
public String doGet(String username,String password){  
    String getUrl = urlAddress + "?username="+username+"&password="+password;  
    try {  
        url = new URL(getUrl);  
        uRLConnection = (HttpURLConnection)url.openConnection();  
        InputStream is = uRLConnection.getInputStream();  
        BufferedReader br = new BufferedReader(new InputStreamReader(is));  
        String response = "";  
        String readLine = null;  
        while((readLine =br.readLine()) != null){  
            //response = br.readLine();  
            response = response + readLine;  
        }  
        is.close();  
        br.close();  
        uRLConnection.disconnect();  
        return response;  
    } catch (MalformedURLException e) {  
        e.printStackTrace();  
        return null;  
    } catch (IOException e) {  
        e.printStackTrace();  
        return null;  
    }  
}  

//向服务器发送post请求
public String doPost(String username,String password){  
    try {  
        url = new URL(urlAddress);  
        uRLConnection = (HttpURLConnection)url.openConnection();  
        uRLConnection.setDoInput(true);  
        uRLConnection.setDoOutput(true);  
        uRLConnection.setRequestMethod("POST");  
        uRLConnection.setUseCaches(false);  
        uRLConnection.setInstanceFollowRedirects(false);  
        uRLConnection.setRequestProperty("Content-Type", "application/x-www-form-urlencoded");  
        uRLConnection.connect();  

        DataOutputStream out = new DataOutputStream(uRLConnection.getOutputStream());  
        String content = "username="+username+"&password="+password;  
        out.writeBytes(content);  
        out.flush();  
        out.close();  

        InputStream is = uRLConnection.getInputStream();  
        BufferedReader br = new BufferedReader(new InputStreamReader(is));  
        String response = "";  
        String readLine = null;  
        while((readLine =br.readLine()) != null){  
            //response = br.readLine();  
            response = response + readLine;  
        }  
        is.close();  
        br.close();  
        uRLConnection.disconnect();  
        return response;  
    } catch (MalformedURLException e) {  
        e.printStackTrace();  
        return null;  
    } catch (IOException e) {  
        e.printStackTrace();  
        return null;  
    }  
}

参考资料

http://blog.csdn.net/guolin_blog/article/details/12452307